MURL Guide: Editing with Adobe Premiere Pro and Producing Web Video
Before you move forward…..Transfer your Media!!!
Before you even get started, you always need to Transfer your Media. By this, we mean getting the footage off the camera and onto your hard drive discs. Never edit footage directly off the camera.

How?
- Plug in the usb cable to your camera and a computer.
- Turn the camera on, open the flip-screen and select which camera slot to connect to the computer (the slot on the back of the camera containing the SD card or Sony memory card).
- The camera is now acting as an external hard drive allowing you to access the files. Take the entire AVCHD file and copy it to your external hard drive.
Getting Started- Setting up your project
- Open Premiere.
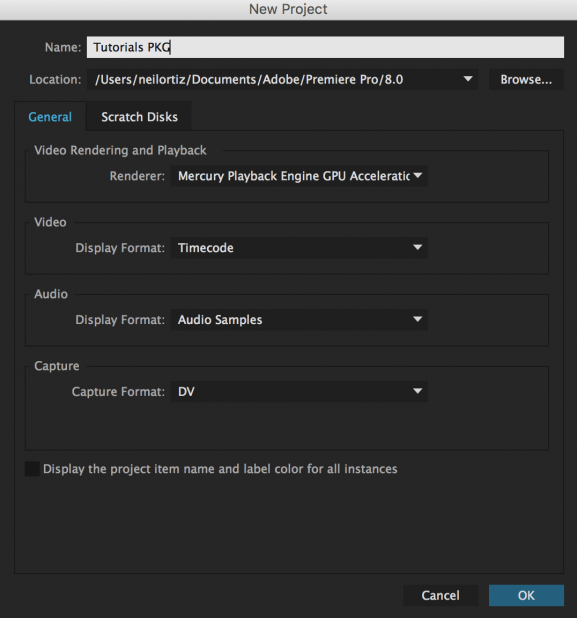
- Click New Project.
- Name your project.
- Choose a location for your project.
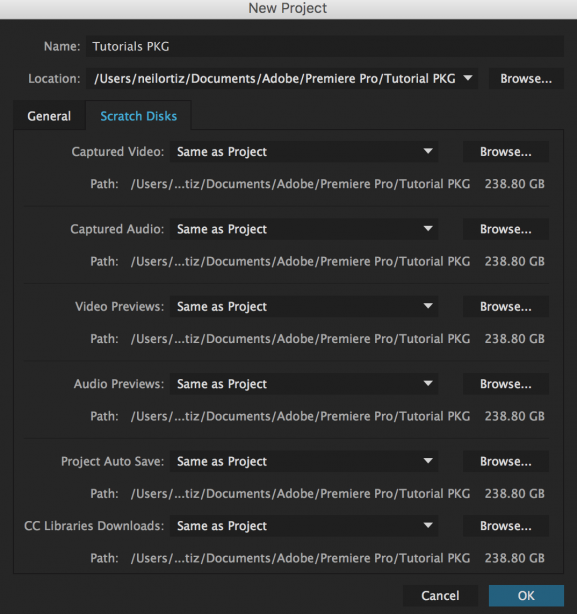
- Set your scratch disks.
- Click OK.
- Go to the Main Menu.
- Select Window.
- Select Workspaces.
- Select Editing, or if Editing is already selected, choose Reset to Saved Layout.
Step by Step:
Your first step when launching Adobe Premiere Pro will be to Create a New Project and set your scratch disks. You should have your own external hard drive and designated folders to set the scratch disks. Give your project a name. You’ll want to easily locate it later.
It is very important to organize your folders right from the beginning. Create a folder for each project and point your scratch disks to that folder (e.g.: “Final Project”).
 If you do not properly organize and save your files you will most likely end up with “media offline” errors.
To set your scratch disks, follow these steps:
- Name your project.
- Choose a location for it as described above.
- Check to make sure that it pointed all the scratch discs to the same location. Unlike FCP, Adobe Premiere Pro should do this by default.
- Click “OK.”


Create a Workspace
You are now ready to begin.
- Select Editing, or if Editing is already selected, choose Reset to Saved Layout. You can also create a custom workspace like the FCP look-alike below & save it. This will then open up next time you pull up a Premiere project from your external hard drive.
Important: Project and Sequence Settings
It is important to line up your project settings before you import media to Premiere. We want to be able to map out audio channels in order to keep them separate until the project is complete.
Steps:
Go to Preferences- General
Make sure the boxes pictured below are checked off. Don’t hit “OK” yet.
Change the window behavior as pictured below.
Go to Audio and change Stereo Media to “Mono.”
Now click “OK.”
—- UPDATE FOR CC 2018 BUILD 12.1.1—
The folks at Adobe moved a few things around. You’ll now find the audio settings under “timeline” as pictured below.

Importing and Organizing your Media
You can either import all of the footage located in the AVCHD file or individual clips from the file (like you could during log & transfer in FCP 7).
Import all Footage:
Importing on Adobe Premiere is easy. To import all of the footage at once, simply click file- import or right click on a grey area of your bin area and then select import. Locate the AVCHD file & you’re all set!
Import specific clips:
If you only want to import a few clips from your AVCHD file (like you were able to do in FCP 7 through log & transfer) follow the instructions below.
- Go to the Project Pane and select the Media Browser tab.
- Highlight the files you want to pull into Premiere and click Import.
- To switch between the icon and list views, hit Command + Page Up/Page Down on your keyboard.
Sequence Settings:
Create a new sequence by following one of the steps pictured below.
Change Sequence Preset to either HDV 1080p30 or HDV 720. Don’t select “ok” yet. Instead, go to Tracks.
Pan Audio 1 to the left. Pan Audio 2 to the right as shown below. Then click “OK.”
Now you are all set to begin editing!
Creating sub-clips…
To better organize your story, you can create what are called “sub-clips” from your footage. To create a sub-clip, you mark in- and out-points and generate new clips from the content in between.
- Go to the Project Pane and double-click on the first piece of footage you’d like to use to create sub-clips for your story, such as one of your interviews.
- In the Source Monitor, press the Spacebar to play the clip you’d like to divide into smaller clips.
- Using the J (play backward), K (pause) and L (play forward) keys (J+K play backward slowly, K+L play forward slowly, J+J plays backward quickly, L+L plays forward quickly), select the point at which you’d like your first sub-clip to begin.
- Press I to mark the in-point.
- Press L to move forward, then K to pause at the point where you’d like to end your clip.
- Press O to mark the out-point for this clip.
- Press Option K to play from your in to out-point.
- Press CMD + U (command + the U key on your keyboard) to create a sub-clip from this selection.
- Name your sub-clip.
- Check the Restrict Trims to Subclip Boundaries box.
- Click OK.
- Repeat this process until you’ve created all of the sub-clips you want from your first interview, then move on to your next interview and create sub-clips from that.
- Create a Bin for your sub-clips and drag all of your sub-clips there to stay organized.
Editing Your Clips:
Three Point Editing refers to a system of editing where three edit points of reference are used in a given combination (eg: in/out + in) and either inserted or overwritten to the timeline sequence.
Get in the habit of not using drag and drop. It is good discipline to use the keyboard shortcuts to either overwrite to the timeline or insert to the timeline. This ensures that the editing process is done with absolute precision. It is also in line with the editing methods used by pretty much every major media organization.
There are variations to this technique, but the most common version is to select the IN and OUT points of your source video in the Viewer Window, then place the playhead to the IN point in your Timeline/Sequence, (meaning where you want this new clip to begin.) Those are your 3-points. Then you will either perform an Insert Edit or an Overwrite edit. The most important aspect to three-point editing is to only lay in what you need right from the start.
• Hit Command 4 to go to Browser.
• Use Arrow keys to go up and down the list of source clips.
• Hit “Return” to open source video in Viewer Window
• Hit Spacebar or “L” to play video in Viewer.
• Hit the letter “i” to set your IN POINT (where you want the clip to begin)
• Play video (L) to find the end of your shot/soundbite.
• Hit letter “o” to set your OUT POINT (where you want the clip to end)
• Hit Command 3 to go to TIMELINE.
• Use a combination of spacebar, L and/or arrow keys to move the Playhead to the specific frame you want this source clip to begin.
• Then hit either:
• Function F9 for an INSERT Edit
• Function F10 for an OVERWRITE Edit.
An INSERT Edit will insert your source clip from the Viewer into the timeline wherever your playhead is located. It will not erase any clip that may already be there, but it will split a clip in two, to insert that new clip at the point of the playhead in the timeline. Practice this method, and you will understand.
An OVERWRITE Edit will erase whatever clip may be at the point of your playhead in the timeline. You are overwriting the old clip, with the new clip from the Viewer. Practice this method and you will understand.
All your A-Roll should be laid out on V1 and A1 on the timeline. This includes all your interviews, narration, sign-offs, etc. Your B-Roll footage will be placed on V2 and A2 on the timeline. This includes footage that will help drive the narrative and visually illustrate your VO and interviews, etc.
AUDIO
When out in the field with your camera, it is standard to use Audio Channel 1 for Interviews and Narration. This will be recorded by the reporter using the handheld mic. Audio Channel 2 is usually ambient nat sounds. This is picked-up by the cameraʼs mic. By default, both channels of audio are set to pan left or right. They will only play on left or right sides. You will fix this by using the PAN control during the editing.
When you lay down your A-Roll first, only lay down the video and one channel of audio of the audio. Your “good audio” channel, is A1, or channel one, or left channel. Deselect A2 from the timeline during this process so as not to drop in both channels of audio at once.
When laying in B-Roll, it is best to place the video on V1, to give you flexibility on adjusting itʼs final placement. And the B-Roll audio will go on A2. It accomplish this you must set the Target Track to V1, and Deselect A1. (as seen on the next image)
Volume:
Adjust your levels and pan for each b-roll clip accordingly.
Use the OVERLAYS to adjust the audio levels. Try to average out audio at -12db but make sure the audio-level balance between the A-Roll and B-Roll is correct.
To change the volume of a clip, double-click its audio track in the timeline, then raise or lower the pink bar in the Viewer to raise or lower the volume. Make sure all your clips play at the same volume when you listen to it, which does not necessarily mean the pink bar will always be at the same place for all your clips.
Fades and Effects:
To add a fade or other effect, click the Effects tab in the Browser. Drag the effect you want down to the clip in the timeline. The most commonly used video effect is a Cross Dissolve, and the most commonly used audio effect is a Cross Fade.
Customize the keyboard so that you don’t have to move the mouse around as much.
Keyboard shortcuts to Playing Video:
“L” = Play (forward)
“K” = Pause
“J” = Play video in reverse.
By hitting the L or J key multiple times, you can increase the speed of the playback.
“Spacebar” can also be used for Play and Stop/Pause.
To be frame-accurate on where you want to stop your playhead, you can use the Arrow keys to move one-frame at a time, back or forward.
Arrow left, will move one-frame back
Arrow right, will move one-frame ahead.
Arrow up, will take you to previous cut point.
Arrow down, will take you to next cut point.
(.)- period key, will perform an overwrite edit to the sequence timeline.
(,)- comma key, will perform an insert edit to the sequence timeline.
Lower Thirds:
Adding lower thirds is an easy process. The first step to add our banner to your sequence. The second step is to add text while layering it with your banner. Make sure to adjust the size and placement of your banner and text layers.
Adding titles:
- Select where you’d like to add a title on your Timeline and hit Command + T.
- Add your title and adjust the color, type and alignment.
- Add the title to your Timeline on V3.
Banner
We have a lower thirds banner image which you can download here.
Import this banner into your bin.
Easy Method from Samara Grossel:
1.) Title –> New Title –> Default Still
Exporting your video for web:
- Select your Timeline.
- Right Click & Select Export Media or Hit Command + M to export your file or click File- Export Media.
- From the Format dropdown, H.264.
- From the Preset dropdown, choose Vimeo 1080p HD.
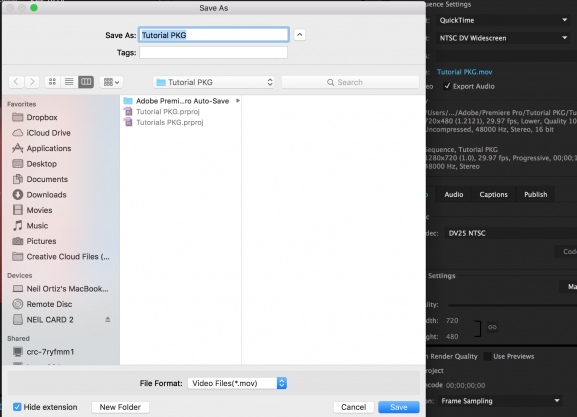
- Give your video a name and choose a location for it to save.
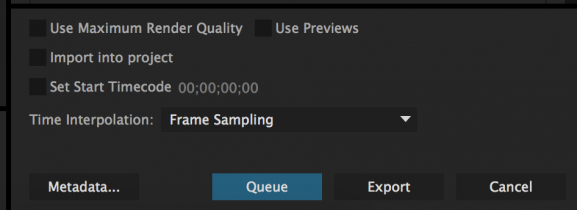
- Check Export Video and Export Audio.
Click on to the blue text next to “Output Name” in order to change file name & to select location


For those looking for more extensive tutorials on Premiere, check out Premiere Pro CC Essential Training. Also, here is a link to Premiere’s keyboard shortcuts.


